


Wallets are one of the most popular fintech products in the world today. It serves a wide range of use cases from traditional fintech apps like CashApp to other app categories like eCommerce (Shopify), travel (Booking.com), gaming (Call of Duty Mobile), etc.
To use a wallet, you typically add money from a bank account or credit card before making transactions in the app.
In this guide, we’ll show you how to build a wallet product step-by-step using Blnk Finance, with Stripe as your payment provider, to create a smooth and reliable experience.
The User Experience
Let’s create a wallet feature for an eCommerce app using AcmePay, a payment method that offers 5% cashback on checkout purchases. When users sign up, an AcmePay wallet is automatically created for them. Here’s how it works:
- Users fund their AcmePay wallet via bank transfer or credit/debit card.
- At checkout, users choose AcmePay as their payment option.
- The purchase amount is deducted from their AcmePay wallet balance.
- Users receive 5% cashback, credited directly to their AcmePay wallet.
To build this, you need the following:
- A payment provider to handle online payments. We'll use Stripe for this guide
- A double-entry ledger to accurately track transactions and wallet balances.
Money Movement Map
First, start by determining how money moves in our system for each transaction — wallet funding, making a purchase, and receiving cashback. This provides a bird's eye view of the flow of funds within AcmePay.
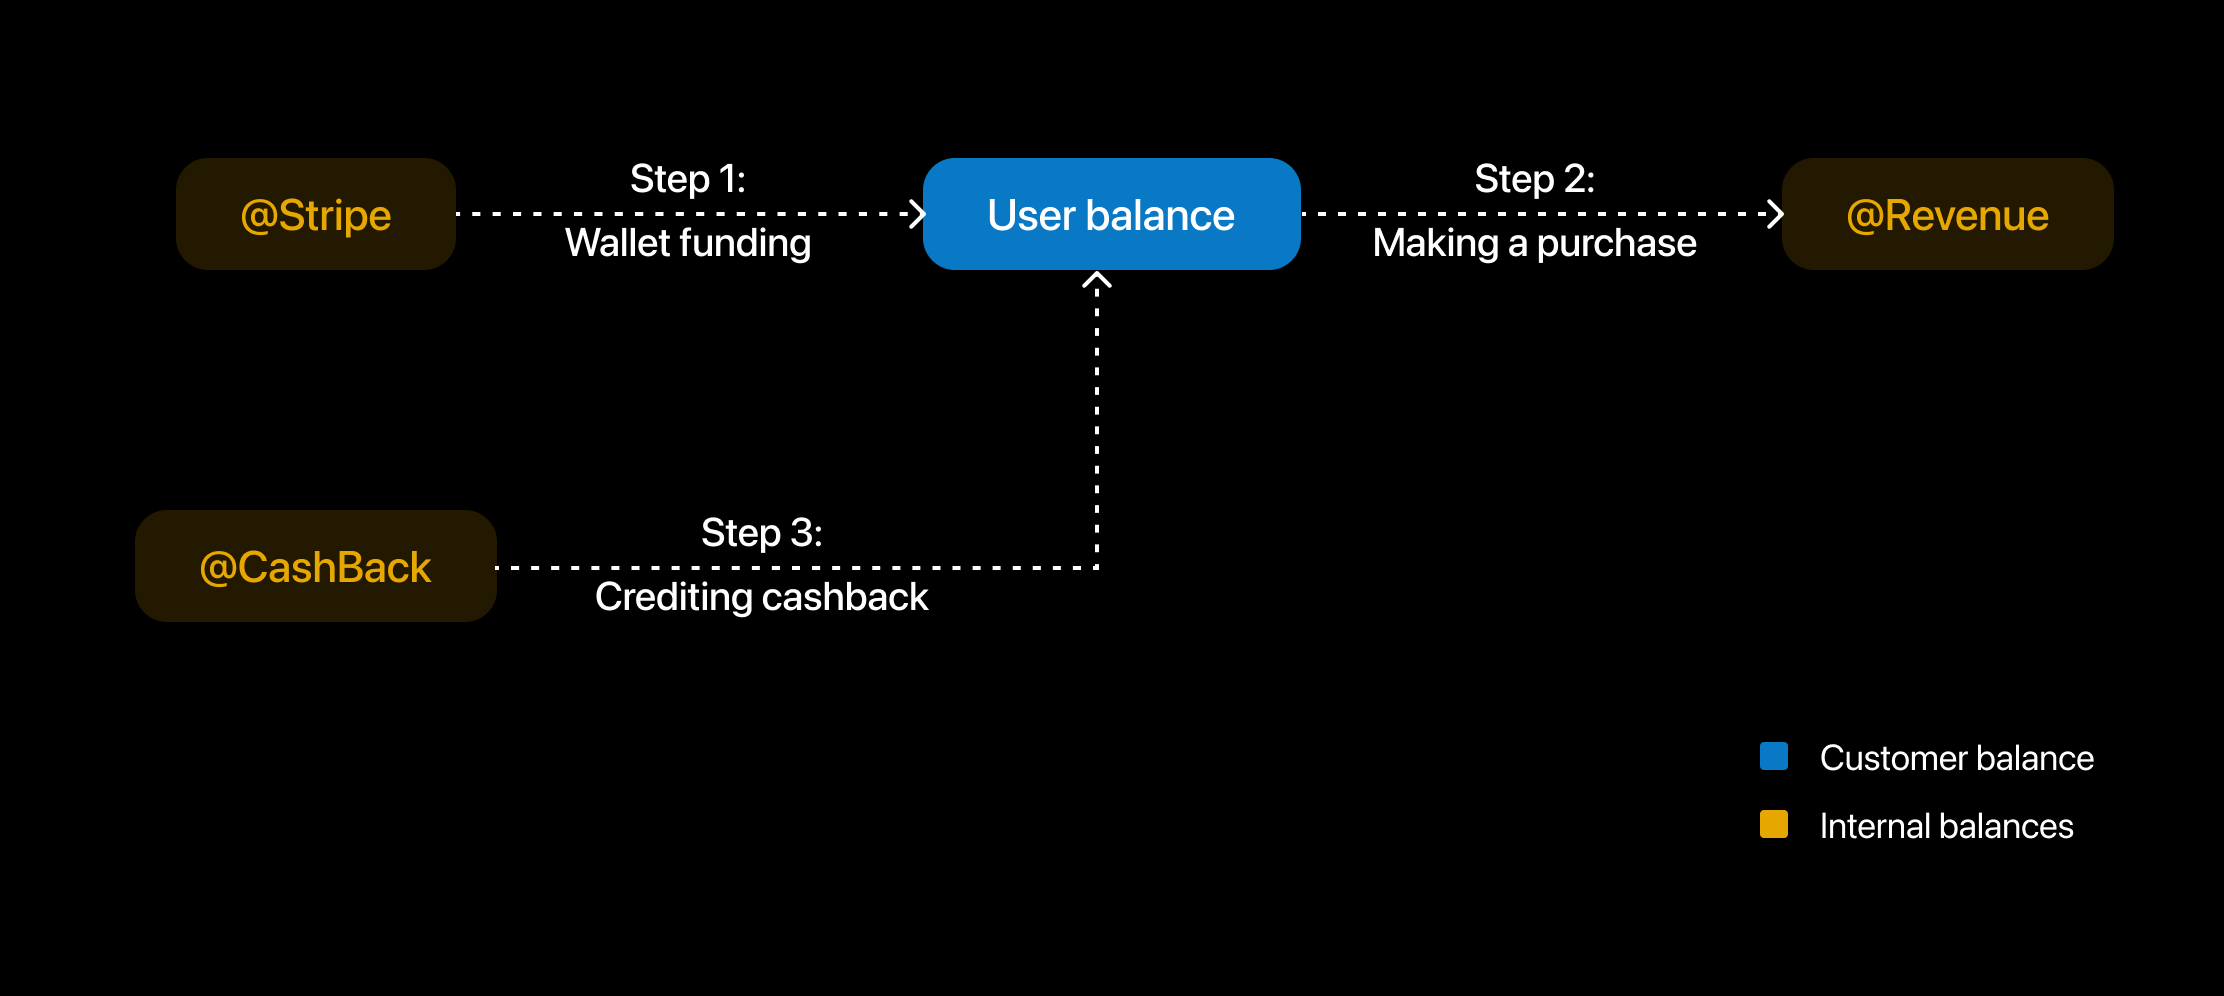
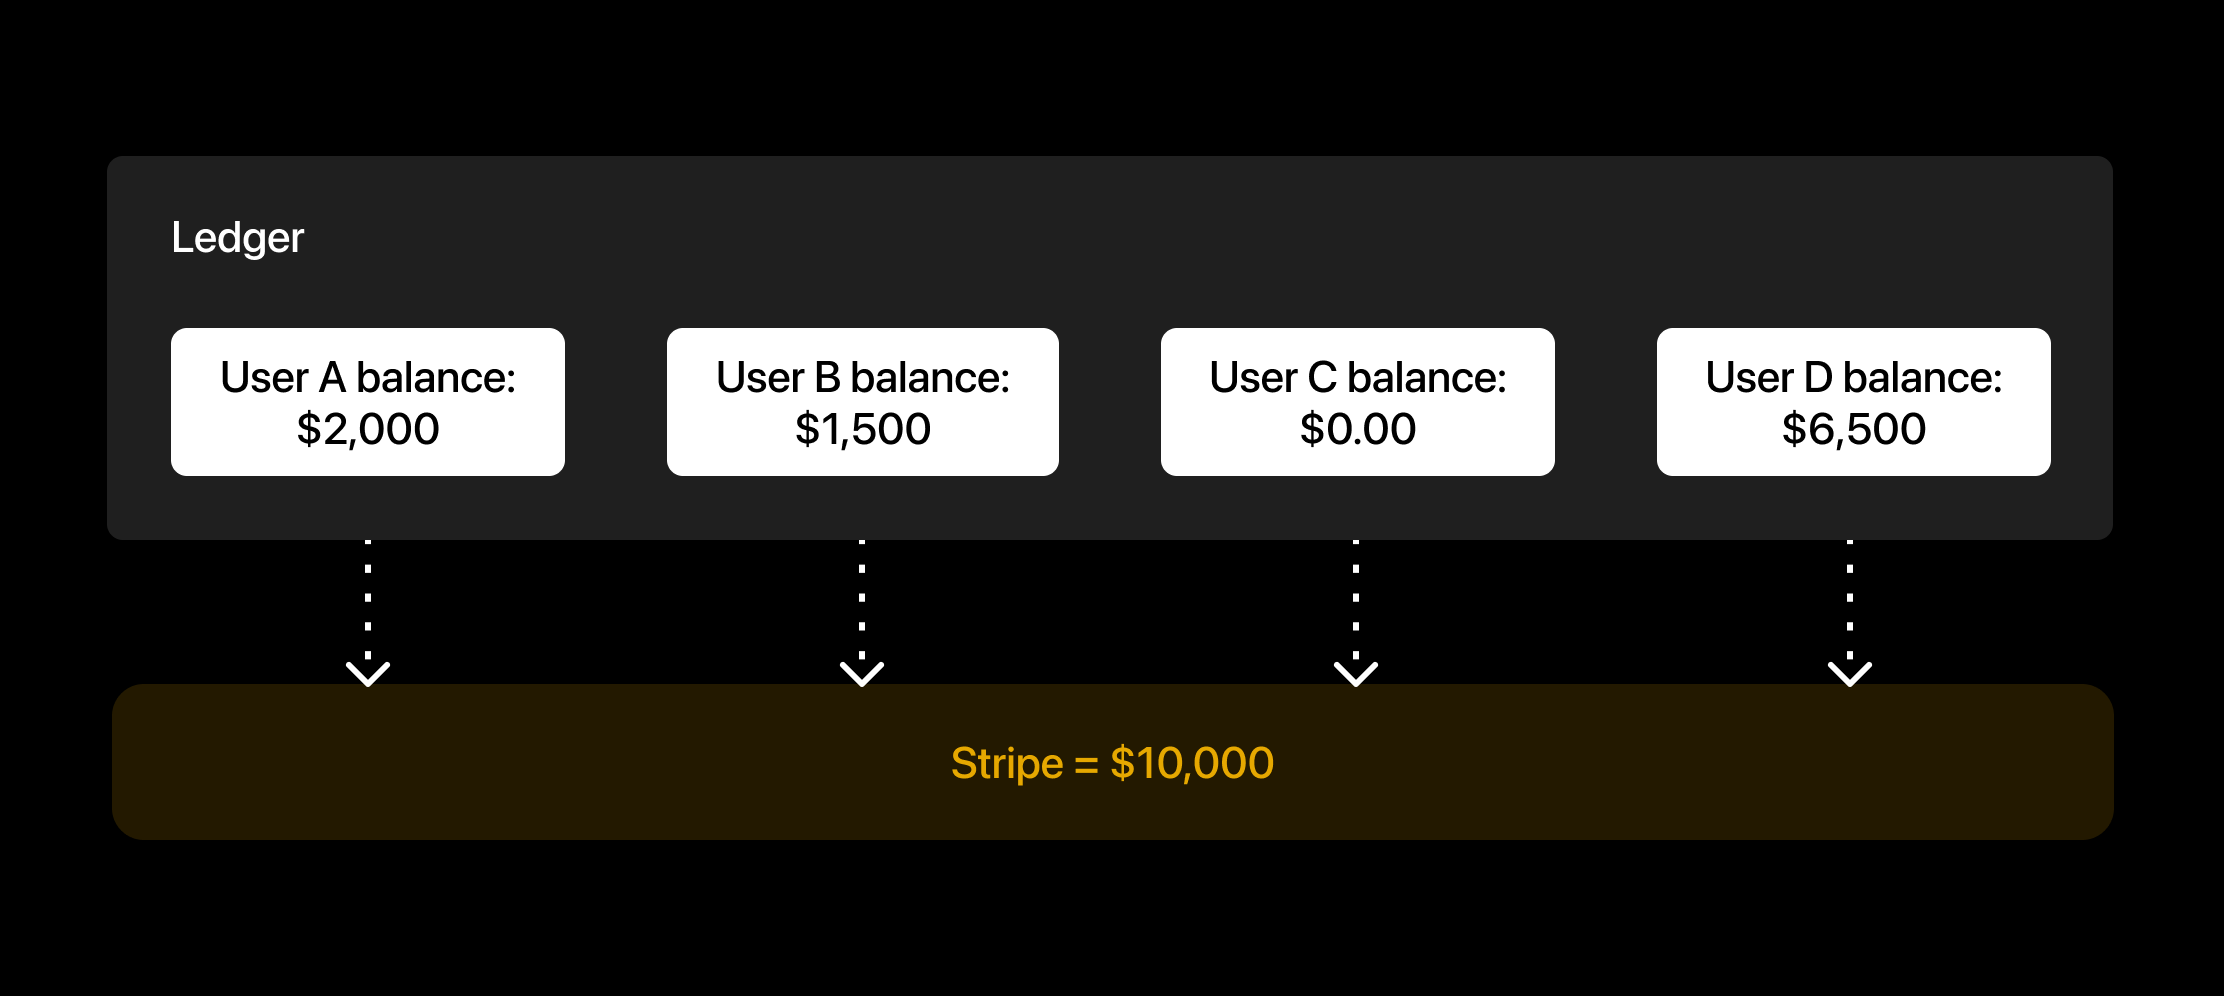
Next, we set up our ledger architecture. Our ledger is how we know how much each user has in our system because Stripe will only show the total amount deposited across all users in our system.
1. Implementing Our Wallet
Now that we've defined our user experience and money movement map, let's dive into building our wallet. To follow this guide, you need to have a live instance of Blnk Core and a Stripe account.
Step 1: Set up your Users Ledger
You need to create a ledger to keep track of all balances created for users in AcmePay. This is the only ledger we need to create for this guide.
To set up our Users Ledger, make a request to the Create Ledger endpoint as follows:
```
-- CODE language-bash --
curl --request POST \
--url http://localhost:5001/ledgers \
--header 'Content-Type: application/json' \
--data '{
"name": "Users Ledger",
"meta_data": {
"organization": "AcmePay",
"description": "For all users wallet created & managed by Acme."
}
}'
```
Step 2: Creating the user wallet
To create the user wallet, we'll do the following:
- Create a customer on Stripe, and retrieve the customer id.
- Create an identity on Blnk and add the Stripe customer id to its metadata.
- Create a balance on Blnk using the identity id from Blnk.
I. Create a customer on Stripe
This helps us identify the user when they fund their wallet via Stripe checkout.
```
-- CODE language-javascript --
const stripe = require('stripe')('sk_test_51Q8vs7Rr ... Eh00okDxEs1L');
const customer = await stripe.customers.create({
name: "Charles Xavier",
email: "charlesxavier@example.com",
metadata: { "userId": "123" }
});
```
II. Create an identity on Blnk
This helps us identify the user within our ledger. Once linked to a balance, all transactions performed by the balance can be traced to a user.
```
-- CODE language-javascript --
async function createIdentity(stripe_created_id, User) {
const response = await axios.post(
'http://localhost:5001/identities',
{
first_name: User.firstName,
last_name: User.lastName,
email: User.email,
meta_data: {
stripe_id: stripe_created_id
}
},
{
headers: {
'Content-Type': 'application/json',
'X-blnk-key': 's_key_x7k9p-4m2nq-8r5t-1v3wy-z6bjd'
}
}
);
console.log("Customer Identity created:", identity.data.identity_id);
return identity.data.identity_id;
}
```
III. Create a balance for the user
This is how we store cash balances and record transactions that the user makes within our application.
```
-- CODE language-javascript --
async function createMainWallet(ledgerId, identityId, currency) {
const balances = await axios.post("http://localhost:5001/balances",
{
ledger_id: ledgerId,
identity_id: identityId,
currency: currency,
meta_data: {
wallet_type: "main"
}
},
{
headers: {
"Content-Type": "application/json"
}
}
);
const balanceId = balances.data.balance_id;
console.log("Main Wallet created:", balanceId);
return balanceId;
}
```
2. Wallet Funding
To handle wallet top-up, we will:
- Get the amount from the customer via the app.
- Initiate a Stripe checkout session with customer's email or id and generate a unique reference id.
- Listen for webhooks to know when the payment is created or completed.
- Create a transaction in the ledger to update your user's balance. Use the same reference id.
Step 1: Create a new Stripe checkout payment
Start by creating an inflight transaction to initiate the payment in your ledger. This creates the transaction but doesn't apply it to the balances until payment is confirmed by Stripe.
Make sure to generate a unique reference id for each new transaction in your app.
```
-- CODE language-javascript --
async function walletFunding(reference, amount, currency, customerBalanceId, stripeSessionId, paymentMethod) {
const response = await axios.post("http://localhost:5001/transactions",
{
amount: amount,
precision: 100,
currency: currency,
reference: "ref_acmepay-01",
source: "@Stripe",
destination: customerBalanceId,
allow_overdraft: true,
inflight: true,
description: "Topup via Stripe",
meta_data: {
payment_method: paymentMethod
}
},
{
headers: {
"Content-Type": "application/json"
}
}
);
const transactionId = response.data.transactionId;
console.log("Transaction created:", transactionId);
return transactionId;
}
```
Next, create a Stripe amount using the same reference and adding the transaction and balance id to the metadata:
```
-- CODE language-javascript --
const stripe = require('stripe')('sk_test_...');
const session = await stripe.checkout.sessions.create({
payment_method_types: ['card'],
line_items: [
{
price_data: {
currency: 'usd',
product_data: {
name: 'Top-up',
},
unit_amount: 2000,
},
quantity: 1,
},
],
metadata: {
blnk_balance_id: "bln_ 123",
blnk_transaction_id: transactionId
},
mode: 'payment',
success_url: 'https://yourdomain.com/success',
cancel_url: 'https://yourdomain.com/cancel',
client_reference_id: 'ref_acmepay-001'
});
```
Step 2: Listen for webhooks to know when the payment is captured
Set up a webhook handler to listen for events from Stripe. Then use these events to handle updating the status of the inflight transaction in your ledger.
If successful, the inflight transaction is committed. If failed or expired, it is voided.
```
-- CODE language-javascript --
const express = require('express');
const app = express();
const stripe = require('stripe')('sk_test_51Q8v ... MnEh00okDxEs1L');
const endpointSecret = 'whsec_b653c958ed ... 578088ea2';
app.post('/webhook', express.raw({ type: 'application/json' }), (request, response) => {
const sig = request.headers['stripe-signature'];
let event;
try {
event = stripe.webhooks.constructEvent(request.body, sig, endpointSecret);
} catch (err) {
response.status(400).send(`Webhook Error: ${err.message}`);
return;
}
const session = event.data.object;
console.log('Checkout session completed:', session.id);
if (event.type === 'checkout.session.completed') {
function commitPayment(session.metadata.blnk_transaction_id)
} else if (event.type === 'checkout.session.async_payment_failed' || 'checkout.session.expired') {
function voidPayment(session.metadata.blnk_transaction_id)
}
response.status(200).end();
});
app.listen(4242, () => console.log('Running on port 4242'));
```
Step 3: Update the user balance in your ledger
If successful, commit the inflight transaction in your ledger to update your user's balance.
```
-- CODE language-javascript --
async function commitPayment(transactionId) {
const url = `http://localhost:5001/transactions/inflight/${transactionId}`
const response = await axios.put(url,
{
status: "commit"
},
{
headers: {
"Content-Type": "application/json"
}
}
);
const transactionId = response.data.transactionId;
console.log("Transaction committed:", transactionId);
return transactionId;
}
```
If failed, void the transaction instead:
```
-- CODE language-javascript --
async function voidPayment(transactionId) {
const url = `http://localhost:5001/transactions/inflight/${transactionId}`
const response = await axios.put(url,
{
status: "void"
},
{
headers: {
"Content-Type": "application/json"
}
}
);
const transactionId = response.data.transactionId;
console.log("Transaction voided:", transactionId);
return transactionId;
}
```
3. Making a Purchase
According to our flow of funds, when our user makes a purchase, we record a transaction from the user balance to an internal Revenue balance in our ledger.
To implement this, make a request to the Record Transaction endpoint as follows:
```
-- CODE language-javascript --
async function walletFunding(reference, purchaseAmount, currency, customerBalanceId) {
const response = await axios.post("http://localhost:5001/transactions",
{
amount: purchaseAmount,
precision: 100,
currency: currency,
reference: reference,
source: customerBalanceId,
destination: "@Revenue",
description: "Payment for online purchase",
meta_data: {
payment_method: "AcmePay"
}
},
{
headers: {
"Content-Type": "application/json"
}
}
);
const transactionId = response.data.transactionId;
console.log("Wallet funded:", transactionId);
return transactionId;
}
```
4. Crediting user cashback
Once the purchase has been completed, we record another transaction to credit the customer with their cashback reward from an internal Cashback balance in our ledger:
```
-- CODE language-javascript --
const cashbackAmount = 0.05 x purchaseAmount;
async function creditCashback(reference, cashbackAmount, currency, customerBalanceId) {
const response = await axios.post("http://localhost:5001/transactions",
{
amount: cashbackAmount,
precision: 100,
currency: currency,
reference: reference,
source: "@CashBack",
destination: customerBalanceId,
description: "Cashback reward"
},
{
headers: {
"Content-Type": "application/json"
}
}
);
const transactionId = response.data.transactionId;
console.log("Cashback credited:", transactionId);
return transactionId;
}
```
Conclusion
This guide covers the key steps for managing a wallet, but there are still several important challenges and considerations you’ll need to address when building your wallet product.
For example, you may need to correct an error in your transactions. Since Blnk is immutable, it is impossible to edit a transaction that has been created. The only way to do it is to first refund the transaction, and then post the correct record.
Other considerations include, performing some checks before completing a transaction, handling Stripe refunds, managing wallet withdrawals, and collaborating with other teams like Customer Support for access to your users' financial data.
Getting started
This article outlined a straightforward way to designing a wallet product, however it doesn't cover all of the unique complexities that different wallet products may involve.
If you have questions about how to build your specific use case with Blnk, feel free to reach out to us via Support or contact Sales.
Heading 1
Heading 2
Heading 3
Heading 4
Heading 5
Heading 6
Lorem ipsum dolor sit amet, consectetur adipiscing elit, sed do eiusmod tempor incididunt ut labore et dolore magna aliqua. Ut enim ad minim veniam, quis nostrud exercitation ullamco laboris nisi ut aliquip ex ea commodo consequat. Duis aute irure dolor in reprehenderit in voluptate velit esse cillum dolore eu fugiat nulla pariatur.
Ledger architecture refers to how you group your balances to work for your application
Ordered list
- Item 1
- Item 2
- Item 3
Unordered list
- Item A
- Item B
- Item C
Bold text
Emphasis
Superscript
Subscript
